The McKenzie neck exercises: a clear, safer guide
A plain-English walkthrough of the seven McKenzie neck movements, how to read your symptoms, and when to stop and get help.
The McKenzie Method uses repeated, controlled movements to learn which direction helps your neck. The goal is not to force a stretch or push through pain. It is to find a movement that improves motion and makes symptoms feel more local, less intense, or less frequent.
First, watch where the pain goes
As you exercise, watch one thing closely: where the pain is. Centralization means symptoms that were farther from the spine (in the shoulder, across the shoulders, or down the arm) move back toward the middle of the neck. That is the sign you are exercising correctly and this program is right for you. Pain moving farther from the spine means the opposite.
Know this before you start: an initial increase in pain is common and can be expected. It should settle quickly, usually within the first session, and then be followed by centralization. So judge a movement by the pattern across a session and into the next day, not by the first uncomfortable repetition.
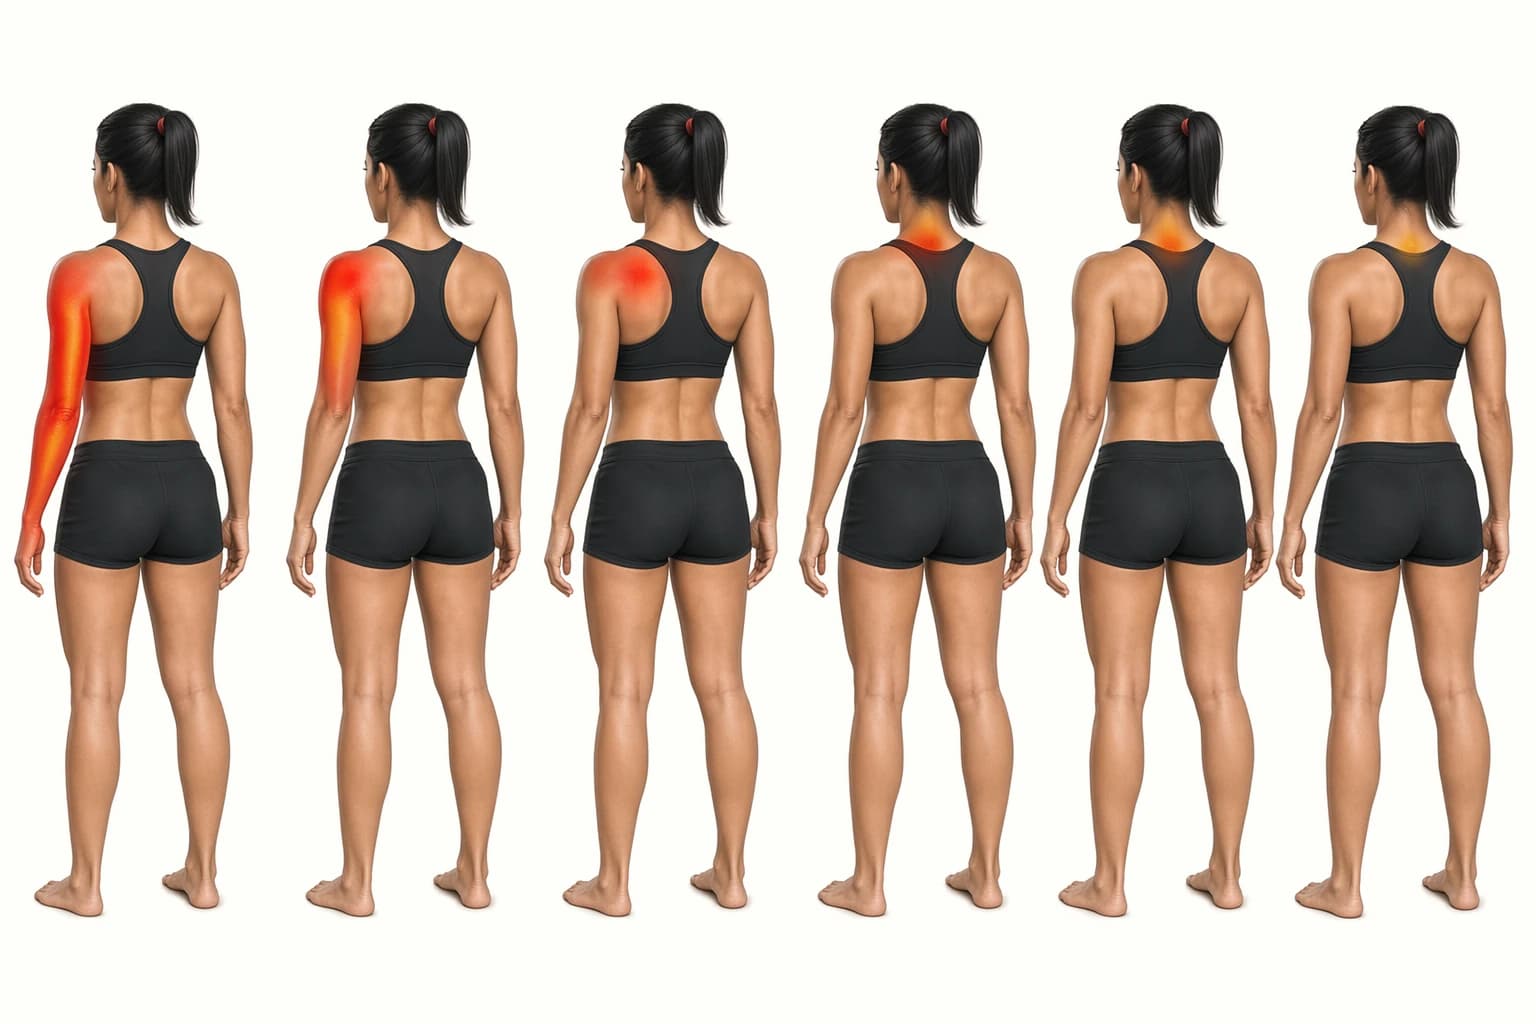
Centralization is not the only improvement worth noticing. Pain can become less intense or less frequent, you can stay active longer or move farther before it starts, and constant pain can become intermittent. Any of these counts as progress.
| What changes? | How to read it |
|---|---|
| Pain increases when you first start | Common and expected. It should settle quickly, usually within the first session. |
| Pain moves toward the neck | The key good sign. You are exercising correctly; continue. |
| Pain is milder, less frequent, or starts later | Also improvement. Location is not the only signal. |
| Pain spreads farther from the spine, or is much worse after exercising and still worse the next day | Stop the exercises and seek advice from a health professional. |
| Tingling, numbness, or pain below the elbow appears for the first time, or worsens | Stop and contact a healthcare professional. |
The seven-movement sequence
The sequence starts with retraction and extension. The lying versions are for acute pain that the seated versions cannot settle. Side bending and rotation are aimed at one-sided symptoms. Flexion comes last and is mainly for headaches, or for leftover pain and stiffness after acute symptoms have settled. You do not need all seven; you are unlikely to ever need more than two in one session. What matters is precision: do each exercise exactly as described, and in the order given.
1. Head retraction while seated
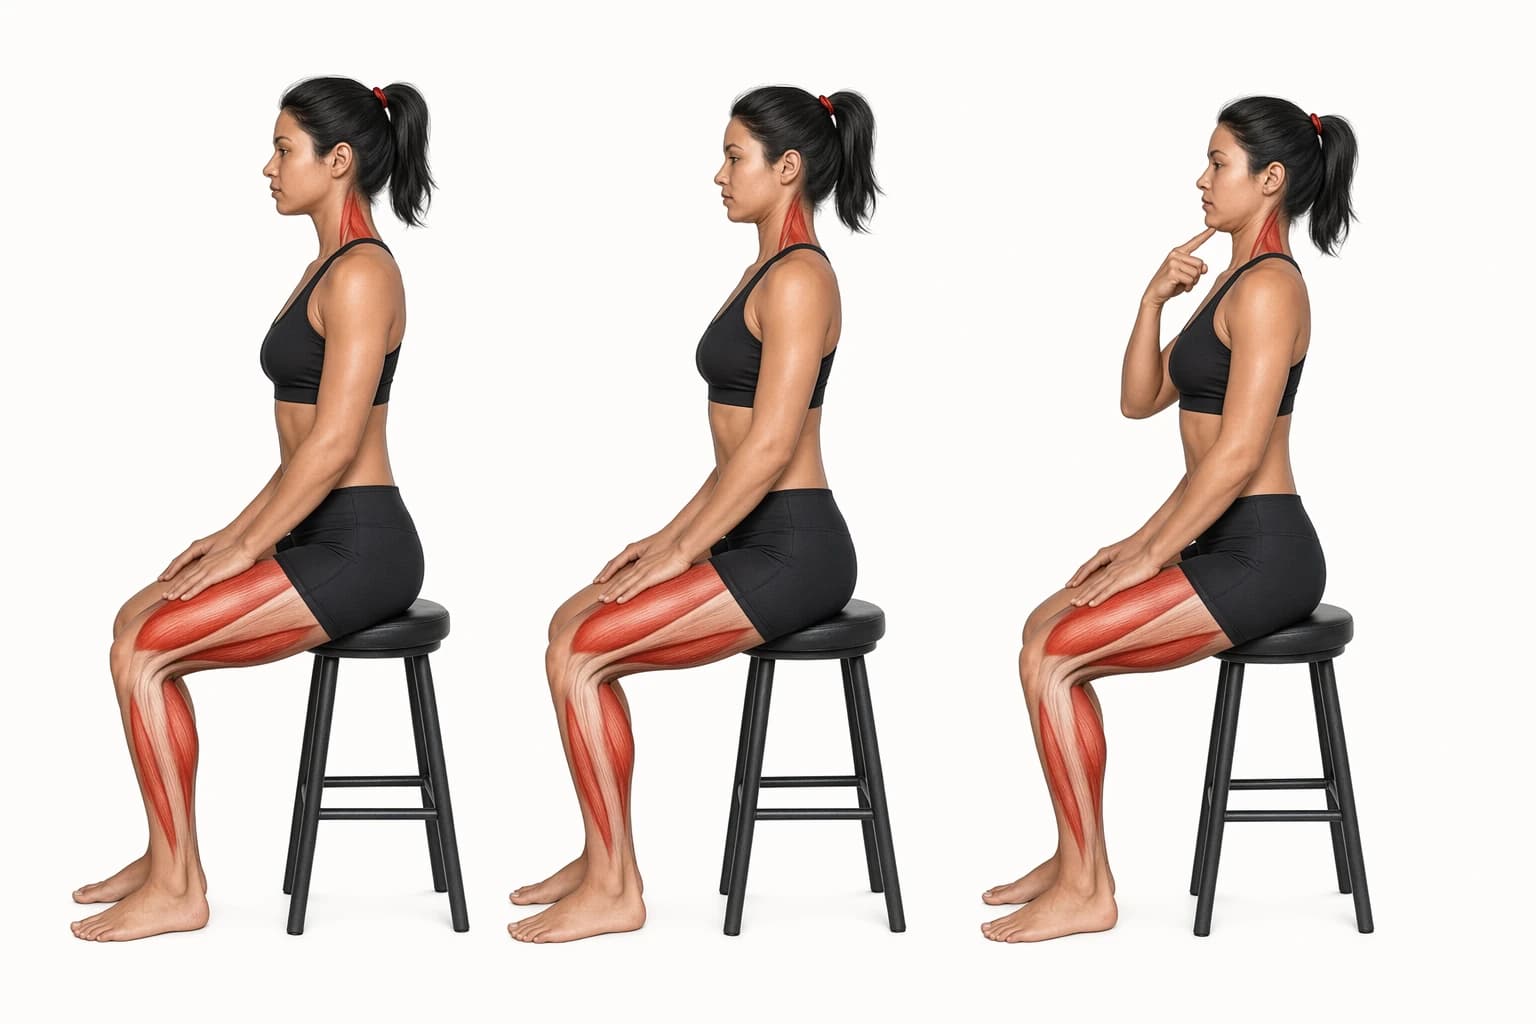
This backward glide, often called a chin tuck, is the first and most important exercise. It is the starting point for most of the sequence.
- Sit on a chair or stool, look straight ahead, and let yourself relax. The head will drift forward a little; that is the starting position.
- Keep your chin tucked down and in, and slide your whole head slowly and steadily backward as far as you comfortably can. Do not tilt the head back to look up.
- Hold for a few seconds, then relax and let the head come forward again.
- Make each repetition reach the full backward movement you can manage. A rhythm of "pressure on, pressure off" helps you hold each position long enough.
- To make the exercise more effective, place both hands on the chin and gently guide the head a little farther back.
If this movement causes acute pain, do not push through. Switch to the lying version (exercise 3) instead.
2. Neck extension while seated
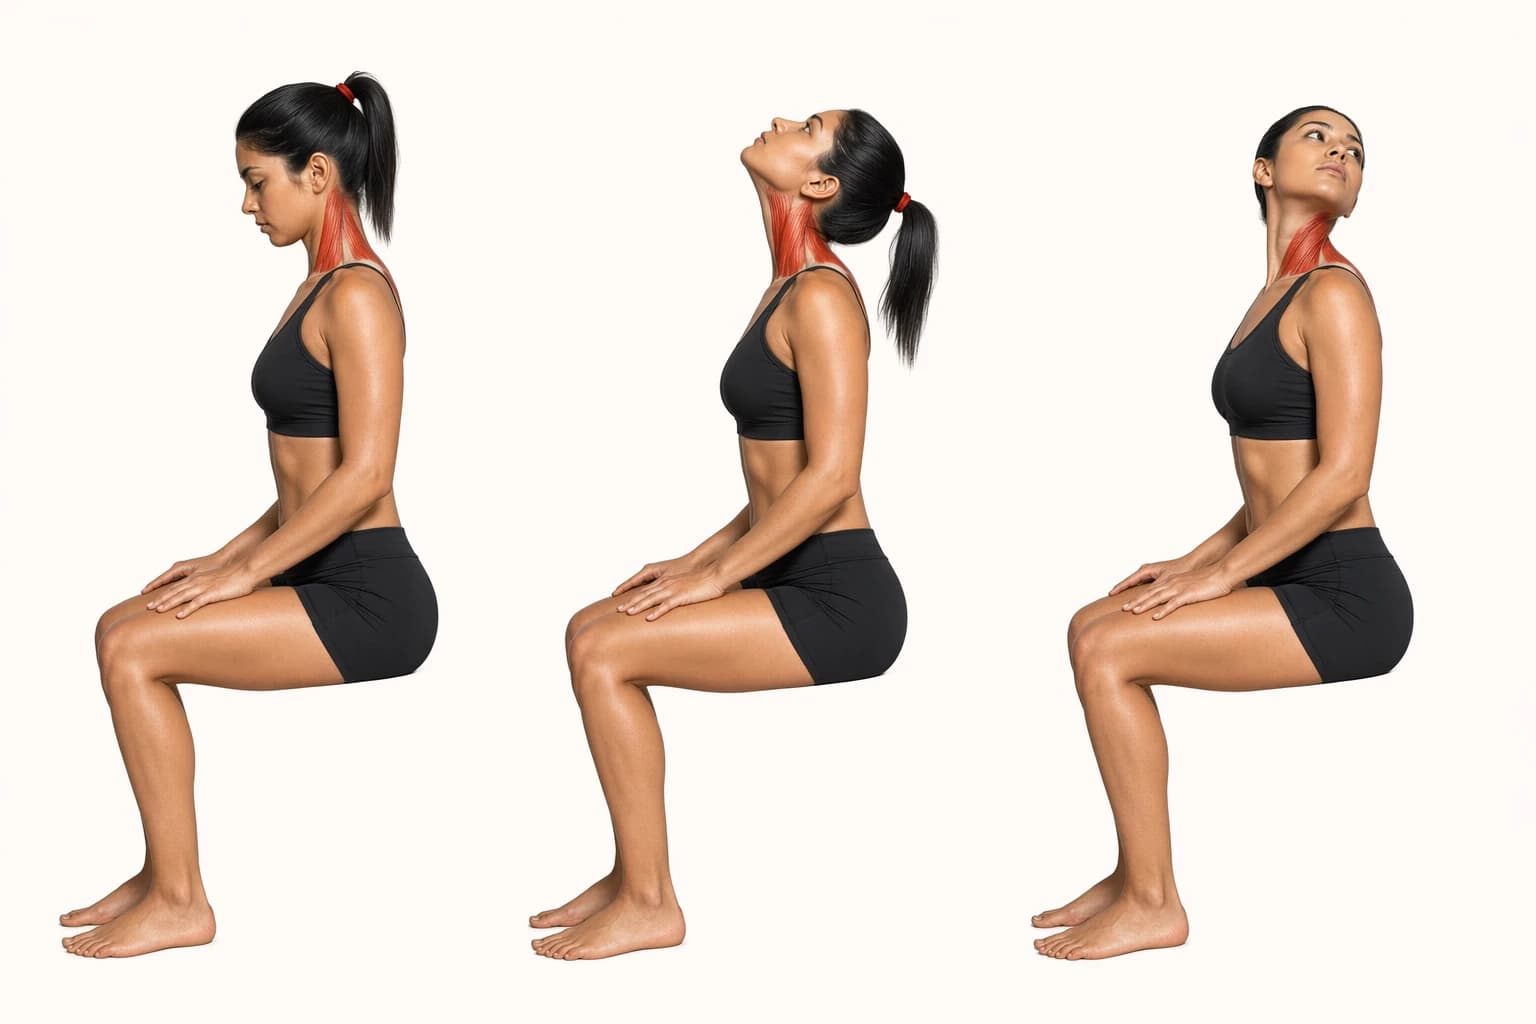
Extension means bending backward. This exercise always follows exercise 1: repeat a few retractions and hold the last one, so the movement starts from the retracted position instead of a poked-forward head.
- Do a few retractions and hold the last one.
- Lift your chin and tilt your head backward as if looking up at the sky, without letting the neck drift forward.
- With the head tilted back as far as comfortable, repeatedly turn your nose about half an inch (two centimeters) right and left of center, all the while easing the head and neck a little farther back.
- After a few seconds, return to the starting position.
If your pain is too acute to tolerate this, use the lying retraction (exercise 3) instead. Once you are practiced at exercises 1 and 2 separately, they can flow together as one exercise.
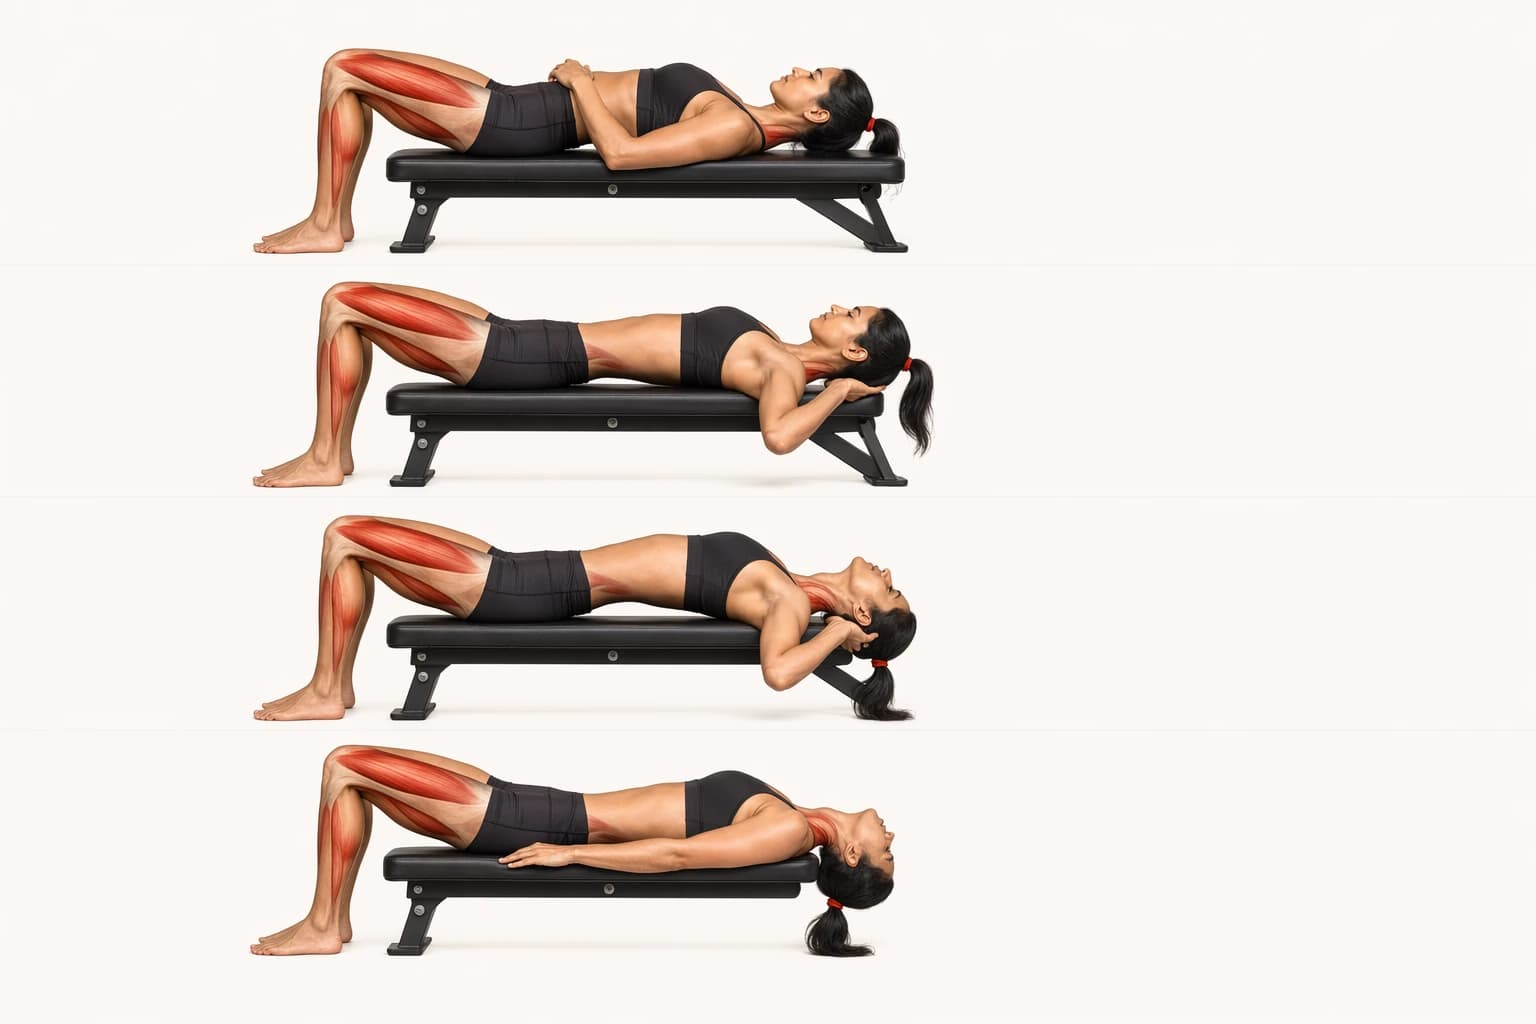
3. Head retraction while lying down
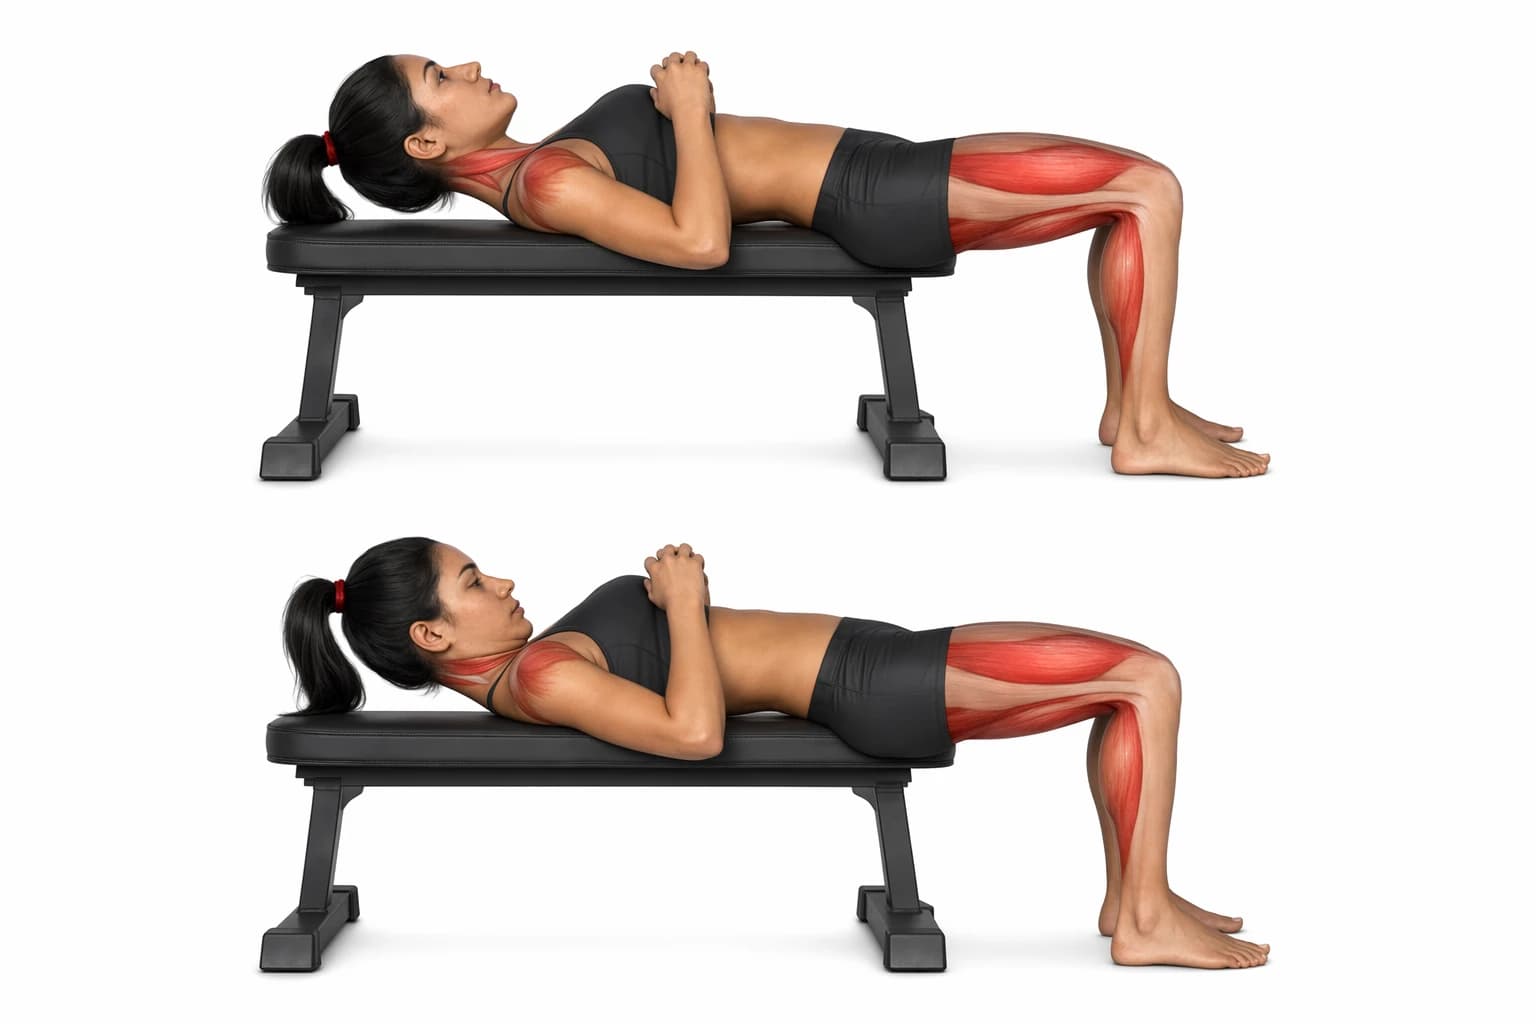
The bed supports the head and neck, which reduces the pain and the load on the spine. Use this version mainly for acute neck pain, or when the seated versions have not helped.
- Lie face-up near a free edge of the bed (not against a headboard), with your head and shoulders flat and no pillow.
- Keep your face toward the ceiling.
- Using your head alone, not your hands, press the back of your head into the surface while pulling your chin in.
- Hold for a few seconds, then fully relax. Make each repetition reach as far back as you can.
- After 10 repetitions, check the response. If the pain has centralized or eased, continue with this exercise; if it has clearly spread or intensified, or you notice pins and needles or numbness in the fingers, stop and seek advice.
4. Neck extension while lying down
- Lie face-up and support your head with one hand under it.
- Move up the bed until your head, neck, and the top of your shoulders are beyond the edge.
- Lower your head slowly toward the floor while keeping it supported.
- If your clinician has cleared it, gradually remove the hand and let the head and neck ease as far back as comfortable. Add the same small nose turn as the seated version, about half an inch to each side, then relax there for two to three seconds.
- Support the head again with one hand, return to horizontal, and move back onto the bed. Do not get up right away; rest flat for a few minutes with no pillow before sitting up.
Unlike the others, this exercise is done only once per session, always right after lying retraction. Both lying exercises are for the acute stage; once acute pain has subsided, replace them with the seated versions (exercises 1 and 2).
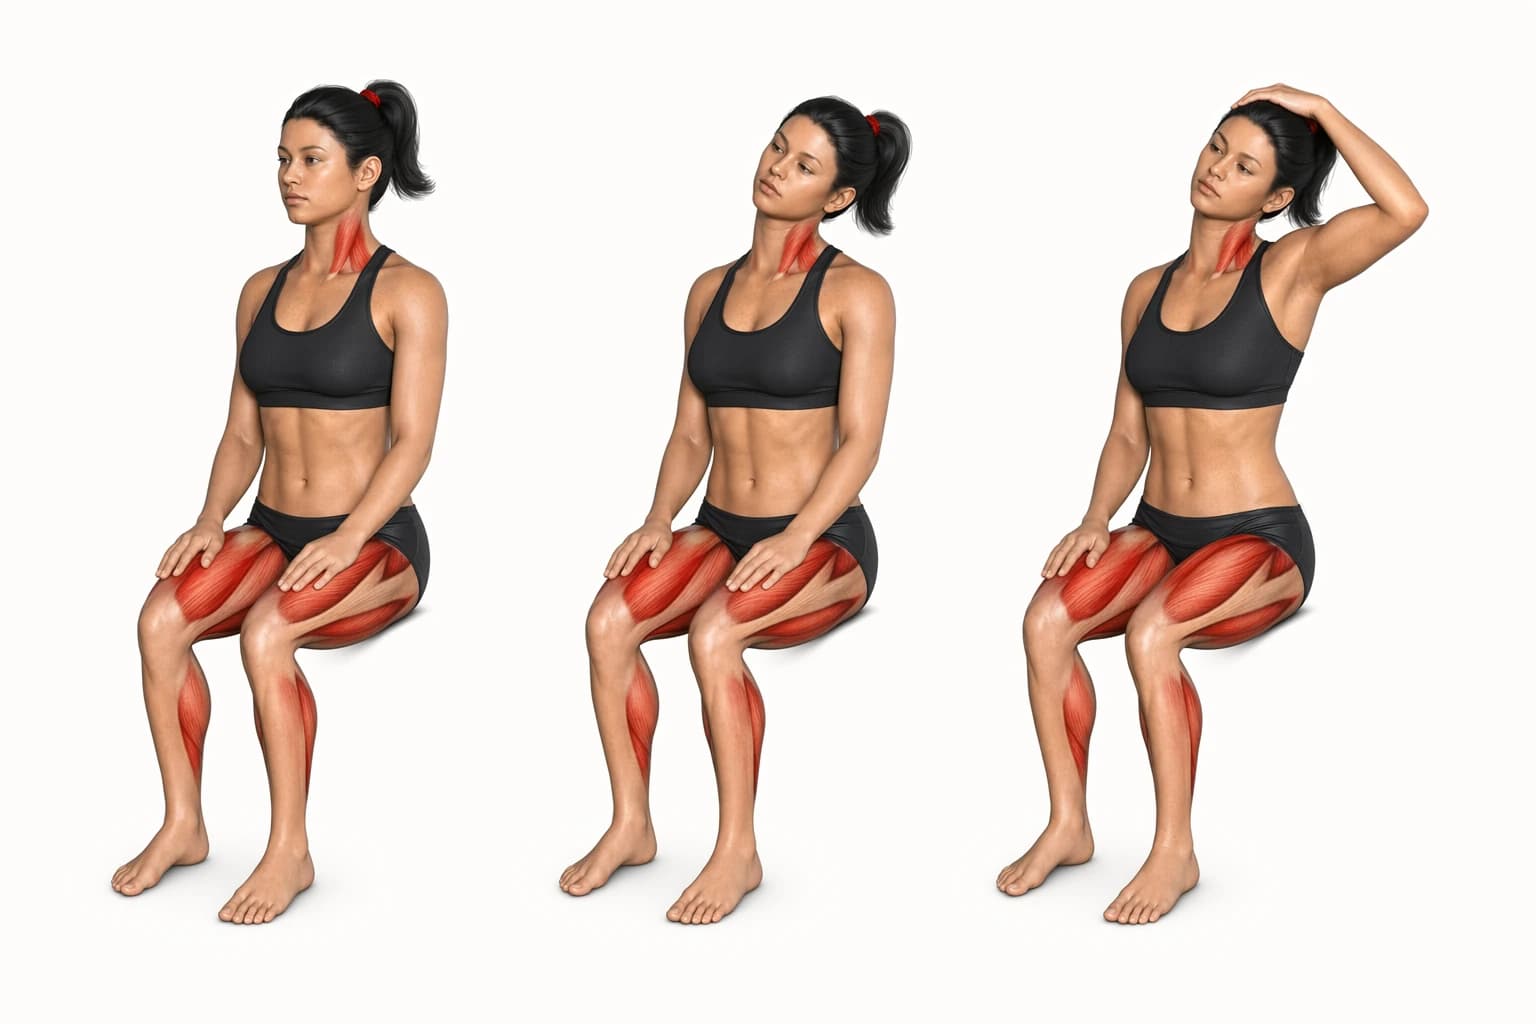
5. Side bending
Side bending moves one ear toward the same-side shoulder. It is specifically for pain felt only on one side, or much more on one side, and the direction matters: bend toward the side that hurts most.
- Repeat exercise 1 a few times and hold the retracted position.
- Keep looking straight ahead as you bring your ear (not your nose) toward the shoulder on the painful side.
- Do not let the head turn, and keep it well retracted throughout.
- To make the exercise more effective, place the hand of the painful side over the top of your head and gently but firmly draw the head a little farther toward that side.
- Hold for a few seconds, then return to the start.
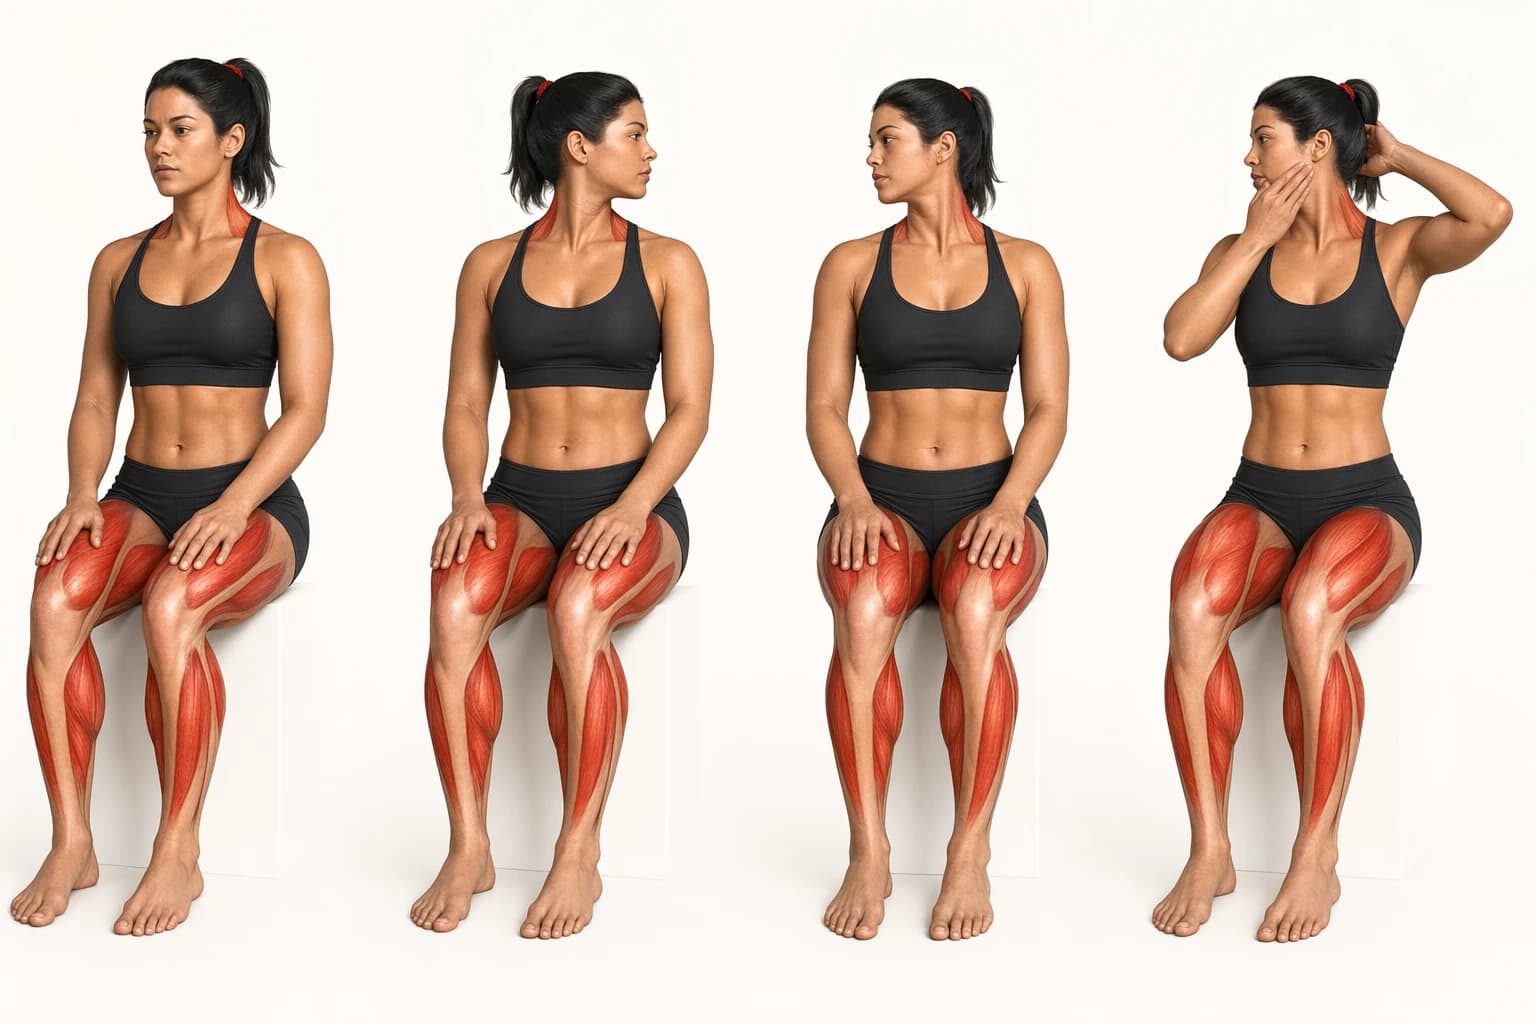
6. Neck rotation
Rotation is a turn far to the right and left, as if checking a street before crossing. If one side hurts more, rotate only toward the more painful side and watch for the pain to centralize or ease. If it instead increases and fails to centralize, switch and rotate only toward the less painful side.
- Repeat exercise 1 a few times and hold the retracted position.
- Turn your head far to one side while keeping it well retracted and your shoulders still.
- Pause at the comfortable limit, then return to center. Both hands can gently push the head a little farther into rotation.
- When both directions feel the same, or nothing hurts, turn to both sides.
Whatever the response, always finish rotation with exercises 1 and 2 (retraction and extension).
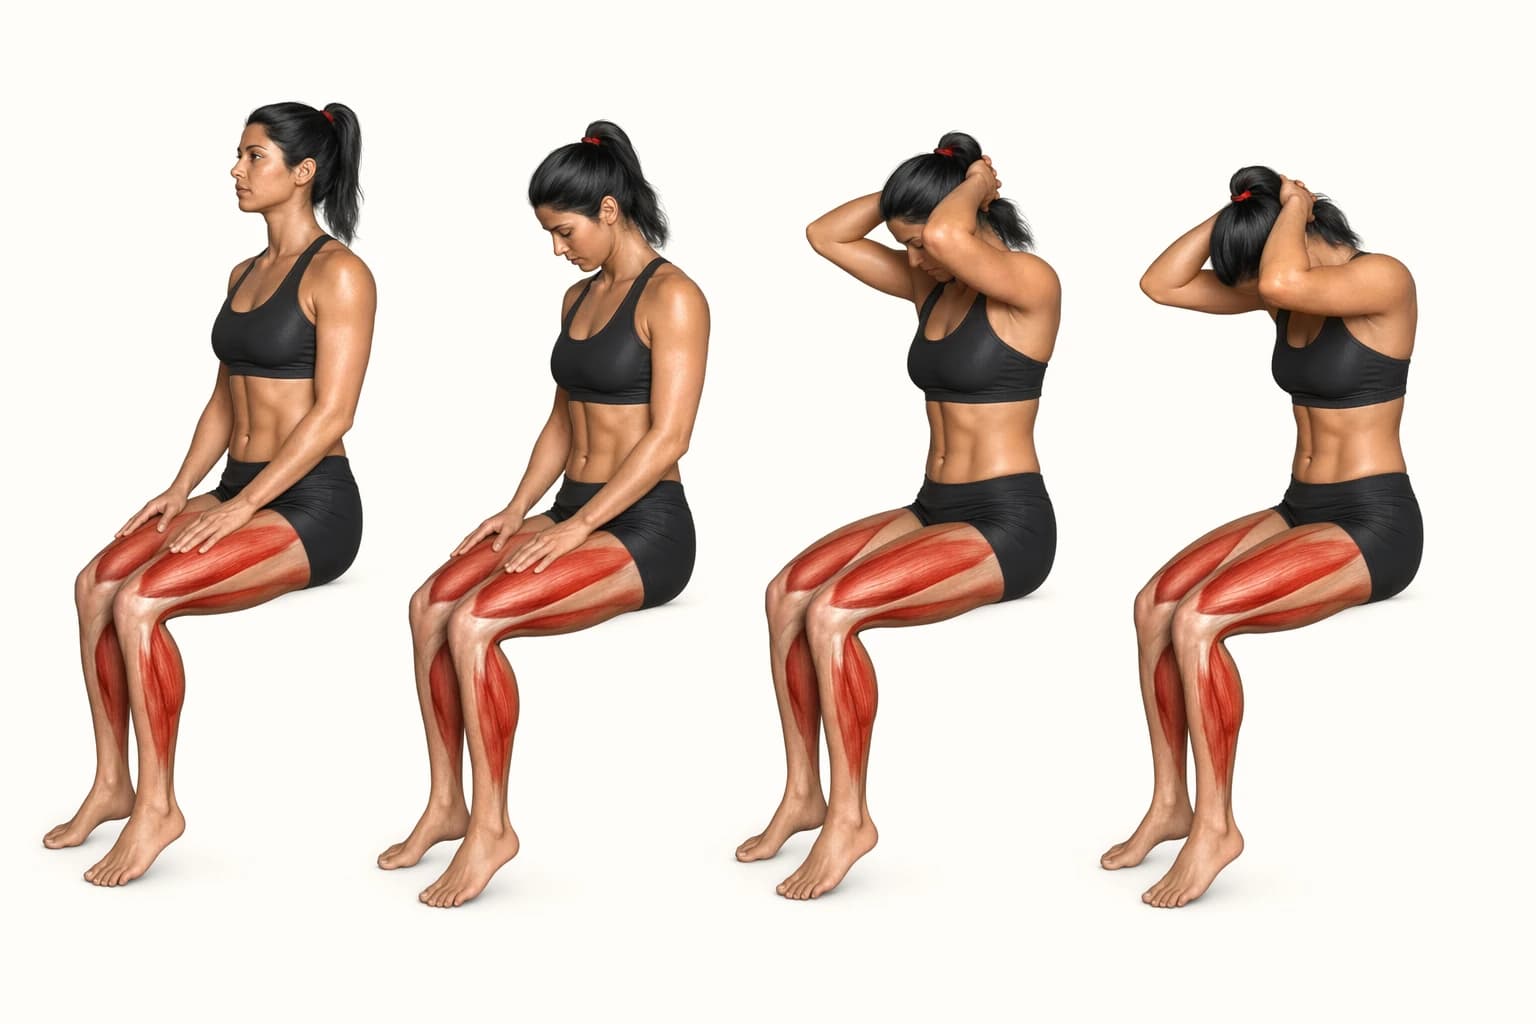
7. Neck flexion while seated
Flexion means bending forward. Use it mainly for headaches, and for leftover neck pain or stiffness after acute symptoms have settled.
- Sit comfortably, look straight ahead, and let yourself relax.
- Drop your head forward and let your chin rest as close to your chest as possible.
- Place both hands behind your head and interlock your fingers.
- Let your arms relax so your elbows point down toward the floor. Their weight draws the head down and the chin closer to the chest; you can add a gentle pull with the hands, but do not pull hard.
- Hold for a few seconds, then return slowly to the start.
Flexion has its own dose: only two or three repetitions per session, not ten. For headaches, pair it with exercise 1; for neck pain or stiffness, always follow it with exercises 1 and 2.
How much should you do?
For most of the exercises, do 10 repetitions per session, with sessions spread evenly six to eight times through the day (roughly every two hours). The two exceptions: lying extension is done once per session, and flexion two or three times. Treat these numbers as a starting framework, not a universal prescription. A clinician may change the movement, range, pressure, repetitions, or frequency based on your response.
- Learn the exercises sitting down; once mastered, sitting or standing both work.
- Start gently and make each repetition precise. Skipping details saves a minute and can slow recovery by weeks.
- When exercising for pain relief, move to the edge of the pain or just into it, then release. Firmer hand overpressure is mainly for stiffness.
- Expect some new, different aches early on as your body performs unfamiliar movements. They usually wear off in three to four days.
- Recent pain often centralizes first, then fades over a few days. Long-standing pain responds more slowly, typically 10 to 14 days of consistent practice.
- Finish every session by correcting your posture. Good posture is the main protection against the pain returning.
Stop rules that matter
- Stop the exercise: pain spreads farther from the spine, is much worse right after exercising and still worse the next day, or symptoms below the elbow appear for the first time or worsen.
- Contact a healthcare professional: symptoms keep worsening, do not improve with self-care, or include headache, numbness, tingling, or weakness.
- Seek urgent medical care: severe pain follows a collision, fall, or other trauma; or you develop trouble walking, loss of coordination, bowel or bladder changes, high fever, or sudden weakness.
FAQ
Keep learning
How long do muscles take to recover?
The 48 to 72 hour rule is a useful starting point, but recovery depends on context.
Guided breathing: Box, 4-7-8, Wim Hof, and more
How box breathing, 4-7-8, the physiological sigh, Wim Hof, and coherent breathing work, and when to use each of the five techniques.
DOMS explained
Delayed onset muscle soreness is common after new or hard training, but it is not a growth signal.